Version 1 as of 4/12/2014:
I was asked for a bit more detail on how it works, so here is a copy of what I tried to explain on
ReefCentral.
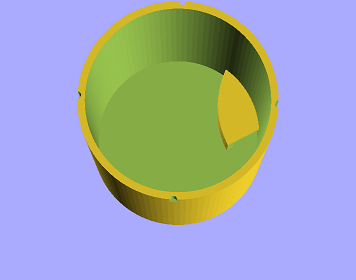
Think of the face of the housing as a clock. The opening sits on the side of it at ~2 to begin with.
The scoop starts at the bottom of the opening and curves up a little ways. When the Arduino starts
up the opening rotates clockwise until it gets to ~8. That means the opening has already passed by
the bottom, dumping what little food might have been in it. As it passes by that the scoop will
collect some more food. Then the servo changes direction and the housing rotates counter-clockwise
back to 2. This dumps out the food that got collected.
One other key detail... The food used for the first and second rounds of testing were small "roundish" pellets generally about 2mm across. The second round had better results than the first. I started off with 5.0g of food. 12 runs later the food had come out at an average rate of 0.4g each time. I am very happy with this consistency so far. I think part of the initial problem with Round 1 testing was that
I filled the housing to the brim.
Here is a picture of the housing render so you can see the inside a bit. This view is from the
backside where the baseplate would be mounted.
 Version 1 as of 4/11/2014:
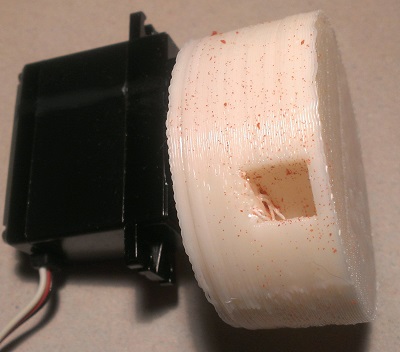
I have completed an initial food housing. This was done using my 3D printer ("Jerry" a ToM kit from MakerBot).
The housing consists of 2 parts. A baseplate and the container. These can be found in this OpenSCAD file along with a few
alternate designs (part of the Changeable requirement).
The print for the housing did not work out entirely right on V1 (pictured below) so the housing
is much shorter than it was meant to be (supposed to be about 50mm and turned out about 18mm tall).
For this version it is not a big issue. It means I had to screw in the baseplate to the servo then
glue the housing onto the baseplate. I had wanted the housing to be able to be slipped on for easier filling and changing... but that can be for the next version. It also makes the housing hold much
less food but again that is not as big of a problem at this time.
Version 1 as of 4/11/2014:
I have completed an initial food housing. This was done using my 3D printer ("Jerry" a ToM kit from MakerBot).
The housing consists of 2 parts. A baseplate and the container. These can be found in this OpenSCAD file along with a few
alternate designs (part of the Changeable requirement).
The print for the housing did not work out entirely right on V1 (pictured below) so the housing
is much shorter than it was meant to be (supposed to be about 50mm and turned out about 18mm tall).
For this version it is not a big issue. It means I had to screw in the baseplate to the servo then
glue the housing onto the baseplate. I had wanted the housing to be able to be slipped on for easier filling and changing... but that can be for the next version. It also makes the housing hold much
less food but again that is not as big of a problem at this time.
 The dimensions of this housing, with baseplate are:
55mm in diameter
25mm tall
The food opening is 8mm by 8mm.
If you view the OpenSCAD file (and perform a compile in OpenSCAD) you will see that the housing is just a big cylinder
with a cube cut out of the one area for the food and a "scoop" on the inside to help guide food to the opening. This entire
housing is mounted onto a servo I had laying in my parts bin. I have NO idea what type of servo this is except that it
is a simple, cheap, plastic gear variety (it has no labels on it and I have no idea how long I have had it).Comparable
servos generally run a for ~$7. Here is a servo that might be comparable.
The Arduino code I am using for this initial test is here.
This code is really simplistic at this point and is based on the Sweep demo on Arduino.cc. It turns the servo 180째 then returns it.
This allows the housing to dump out a small portion of food. The Arduino is set to run once then stop. It will not run again until
reset. I did this as a feature to allow the Apex to control it easily. Turn the Apex outlet on for a bit... turn it off after a few
minutes and repeat for each time you want to feed. Future versions should be able to control more than one feeder, account for types of feeders, and maybe do a bit of checking based on some sensors. I may provide an output method to trigger an Apex breakout input also.
Results of V1 round 1 testing (4/11/2014) was a bit hit or miss. I am using TetraColor Tropical Granules for this test. I typically
do not use flake food an I am not sure how well they would work with the current housing. When completely full it tends to
dump out a bunch of food at first (~1.7g on the first run). The next 4 runs were fairly consistent at 0.7-0.8g each. Then it
dropped to 0.3-0.5g for 10 more runs. Then it started to empty out and was done at about run 19. So if I had not filled it to the brim I would expect I could get ~14 runs reasonably out of it (accounting for the larger initial runs). All of those quantities
seemed pretty reasonably like what I would normally pour into the tank myself (probably with less variation that what I do).
I plan on doing a couple more rounds of testing in the near future.
The dimensions of this housing, with baseplate are:
55mm in diameter
25mm tall
The food opening is 8mm by 8mm.
If you view the OpenSCAD file (and perform a compile in OpenSCAD) you will see that the housing is just a big cylinder
with a cube cut out of the one area for the food and a "scoop" on the inside to help guide food to the opening. This entire
housing is mounted onto a servo I had laying in my parts bin. I have NO idea what type of servo this is except that it
is a simple, cheap, plastic gear variety (it has no labels on it and I have no idea how long I have had it).Comparable
servos generally run a for ~$7. Here is a servo that might be comparable.
The Arduino code I am using for this initial test is here.
This code is really simplistic at this point and is based on the Sweep demo on Arduino.cc. It turns the servo 180째 then returns it.
This allows the housing to dump out a small portion of food. The Arduino is set to run once then stop. It will not run again until
reset. I did this as a feature to allow the Apex to control it easily. Turn the Apex outlet on for a bit... turn it off after a few
minutes and repeat for each time you want to feed. Future versions should be able to control more than one feeder, account for types of feeders, and maybe do a bit of checking based on some sensors. I may provide an output method to trigger an Apex breakout input also.
Results of V1 round 1 testing (4/11/2014) was a bit hit or miss. I am using TetraColor Tropical Granules for this test. I typically
do not use flake food an I am not sure how well they would work with the current housing. When completely full it tends to
dump out a bunch of food at first (~1.7g on the first run). The next 4 runs were fairly consistent at 0.7-0.8g each. Then it
dropped to 0.3-0.5g for 10 more runs. Then it started to empty out and was done at about run 19. So if I had not filled it to the brim I would expect I could get ~14 runs reasonably out of it (accounting for the larger initial runs). All of those quantities
seemed pretty reasonably like what I would normally pour into the tank myself (probably with less variation that what I do).
I plan on doing a couple more rounds of testing in the near future.